


Note: This article’s source is on the Lifecycle Manager Knowledge Base. Click here for the original article.
💡 Resource: Download the ScalePad Warranty Services Sell-Through Kit at the bottom of the article.
We’re excited to introduce a new, streamlined warranty procurement process in Lifecycle Manager.
One intuitive workflow allows you to configure margins, warranty lengths, and co-terminations, send white-label proposals, get approvals, and procure warranties. It's easier than ever.
From start to finish, this guide will walk you through identifying assets that need protection and procuring warranties through initiatives. From selecting your hardware assets to checkout, we'll ensure you have all the necessary information.
Let's start.
1. Navigate to your Strategy Dashboard or a Client Dashboard
- Click Clients in your left-hand navigation bar.
- Click into a selected client on the Client console
Or
- Click the Strategy button in your left-hand navigation bar.
- Click into a predefined insight pane on the Strategy Dashboard
- Click into a client from the Strategic insights
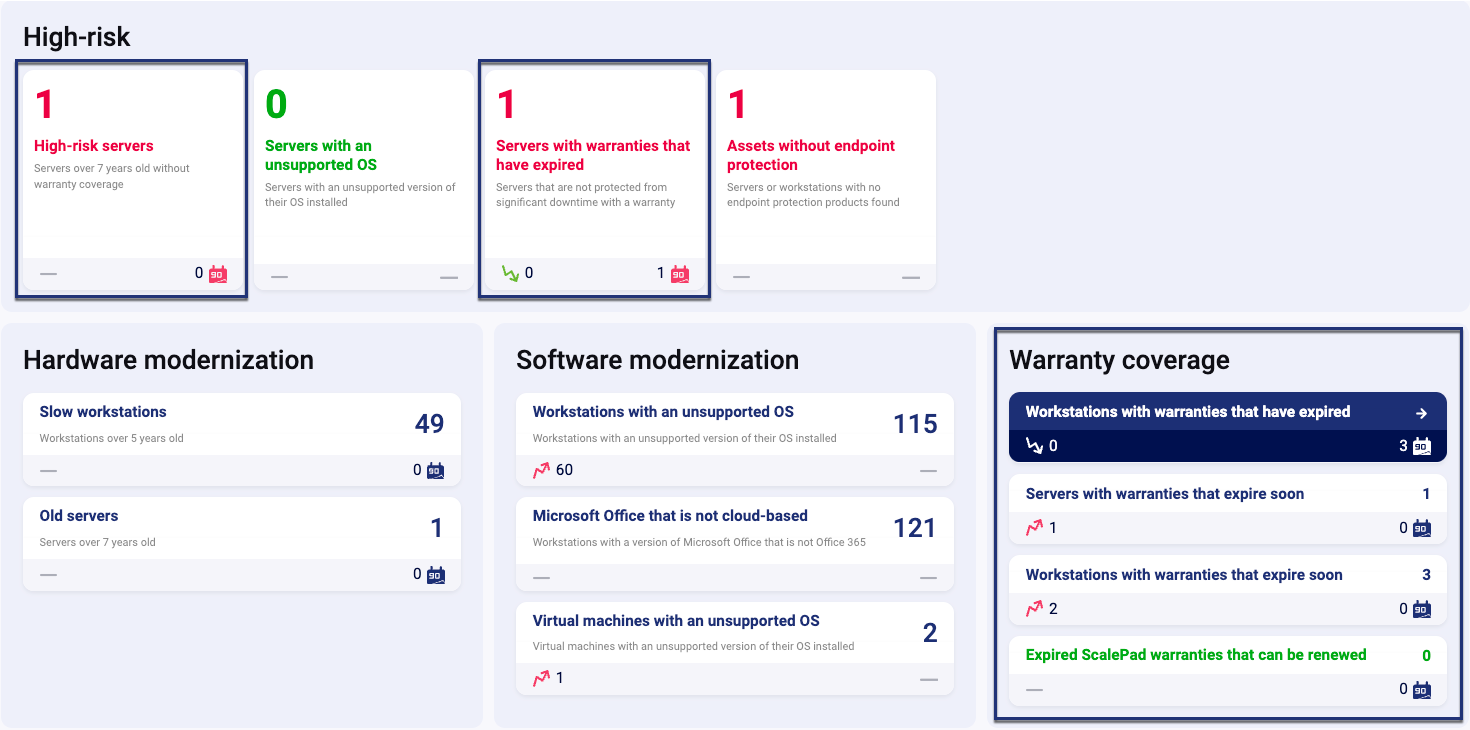
2. Identify the warranty coverage insight you want further details on
Select from the following insights:
- High-risk servers
- Servers with warranties that have expired
- Workstations with warranties that have expired
- Servers with warranties that expire soon
- Workstations with warranties that expire soon
- Expired ScalePad warranties that can be renewed
3. Create an Initiative from a warranty coverage insight
-
From the detailed Insight Asset Console, click the + Add to Initiative button.
-
From the Take action on this asset dialog, under the Add to heading, click + New Initiative and select from the list of Initiative templates. In this example, select the suggested template Workstation Protection.
-
Once the desired template is selected, click Finish.
4. Complete the Initiative
A few specific sections in a warranty initiative should be completed to provide greater clarity for a client. The following steps outline warranty-specific items required to complete an initiative fully.
As you work with a specific asset type in an initiative (i.e., Workstation Protection), any unsupported models in the asset list (such as a manually added server) are identified as Not supported. Hovering over the model type indicates why the initiative does not support an asset. The Checkout button is disabled when non-supported assets are included in the initiative.
-
Make real-time warranty adjustments
- On the Initiative, you can adjust the warranty term length, enable co-termination, and markup percentages directly for selected assets.

- On the Initiative, you can adjust the warranty term length, enable co-termination, and markup percentages directly for selected assets.
-
Remove any asset from the initiative (if applicable)
There are two methods for removing unsupported assets.- Select the checkbox beside the asset in the assets table (this includes unsupported assets)

-
Click Remove asset
or - Click the Remove All button to remove all assets which are not supported when buying Scalepad warranties.

- Select the checkbox beside the asset in the assets table (this includes unsupported assets)
-
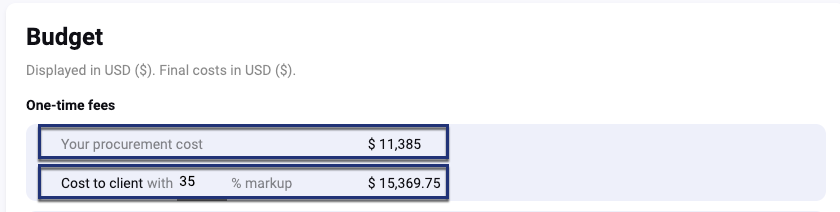
Review procurement and client costs
-
The total cost of warranties for purchase is identified in the Budget section by the Your procurement cost label.
- The cost of warranties for client purchases (with specified markup %) is identified in the Budget section by the Cost to client label.
-
5. Proceed to Checkout
- Click the Checkout button.

- Verify the Client name and site address are correct
- Fill out the Payment Method information
- Select the checkbox I certify that these hardware assets are in full working order and do not currently require service to continue with the order.
- Click the Place Your Order button.
Once you've placed your order, you'll receive a confirmation email that includes your Warranty Coverage Card.